Unlock career success as a new MLIS graduate with tips on building in-person connections, honing key skills, and seizing opportunities for growth and advancement.

Micro-controlled tinkering: Designing Arduino kits using 3D printing
Arduino is a fascinating and fun project for people who like to tinker with objects that they find around them. Originally introduced at an Italian design institute, Arduino is an open-source electronics platform that lets everyone, from the beginner to the expert, create interactive projects. By bringing Arduino and 3D printing together, we’ve extended the capacity and creativity of our makerspace users one step further.
Accessible Arduino: A gateway for makerspace users
I have always loved to take things apart and put them back again—although my mother would probably argue the latter point, given the graveyard of electronic toys I had as a child. Recently, I had the chance to feed my inner tinker-er by taking an in-depth Arduino course at the STEAM Centre, a local makerspace that often partners with the St. Thomas Public Library.
The course gave me a full understanding of how to program Arduino, and I was then able to use these new skills and abilities to craft a two-hour workshop for patrons who wanted to “test the waters” by introducing them to the micro-controllers.
This financially accessible Arduino option means we can offer a gateway for people to either self-teach further using our extensive complimentary makerspace books, or to upgrade to the fee-based, more in-depth options through the courses at the STEAM Centre.
Getting started: Creating a baseplate for our Arduino kits
While I love to take things apart, I faced some design challenges in working with the Arduino kit. In addition to issues of content, most kits come in a box and all the components are jumbled together. This jumble can be overwhelming for the average person who is learning Arduino for the first time.
We have to remove barriers, so that whether a patron is at home or taking a course in the library makerspace, the kit is as simple and accessible as possible.
I decided to lower barriers by organizing the Arduino components using a 3D-printed baseplate—the baseplate keeps the most frequently used components stationary. To do this, I followed a few basic steps:
- I started with 3D-printing housing for all the Arduino motors, to allow them to mount to the baseplate easily and uniformly.
- Then I labelled the components and created a legend, which I secured in the kit container with book tape.
- Next, I created the baseplate itself. All of the 3D prints I used were found on Thingiverse, and the baseplate was customized to create a model that would fit the Arduino breadboard and the most used sensors and actuators that come with an Arduino kit. I had to do a little placement shuffling to figure out how the housings would fit best with each other (all while humming the Tetris theme …) and some super glue to set them in place, and it was done!
- Finally, I replicated this for nine other models.
End result: Making the most of 3D printing and online design tools
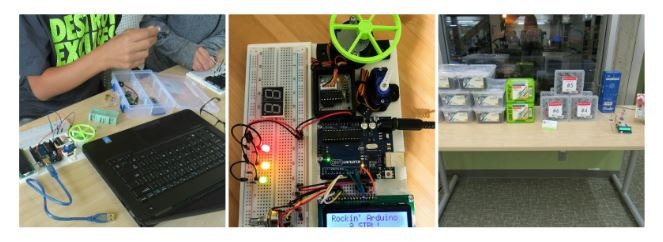
Each of our Arduino kits (boxed up in plastic containers produced courtesy of our 3D printer) contains a USB key, filled with activities and instructions, and patrons can sign them out for up to three weeks.
Creating our own kits was a great experience. We’ve been able to combine the use of our 3D-printers with online design tools to come up with a new tool for our makerspace users (and local tinker-ers) that we are very proud to have in circulation.
Written by Jonathan Mitchell
Photo credit: Nicholas Thomas on Unsplash
Jonathan Mitchell has been a library assistant at St. Thomas Public Library since 2015. Jonathan can be reached at jmitchell [at] stthomaspubliclibrary.ca
Related Posts